
When it comes to desserts, there’s something undeniably comforting about a rich, creamy texture. And let’s be real—this time of year always makes me crave something sweet and indulgent. If you’re someone who loves to whip up delicious treats that feel like a warm hug in dessert form, this post is for you.
I know that cooking can sometimes feel a bit overwhelming, especially when you want to impress your friends or family. That’s why I gathered together 25 dessert recipes using evaporated milk. This magical ingredient adds a smooth, velvety quality that elevates your desserts to a whole new level. Whether it’s for a holiday gathering, a birthday celebration, or just a cozy evening at home, these recipes will bring joy and satisfaction.
In this collection, you’ll discover a range of treats that are not only easy to make but also incredibly delicious. From creamy pies to luscious puddings and delightful cakes, each recipe is designed to be simple yet rewarding. Plus, evaporated milk is often a pantry staple, so you won’t have to run to the store for fancy ingredients.
By the end of this post, you’ll have a treasure trove of ideas to satisfy your sweet tooth. You’ll not only impress yourself with your baking skills but also share some incredible desserts with those you love. So, grab your apron, and let’s dive into these rich and creamy delights that are sure to become favorites in your home!
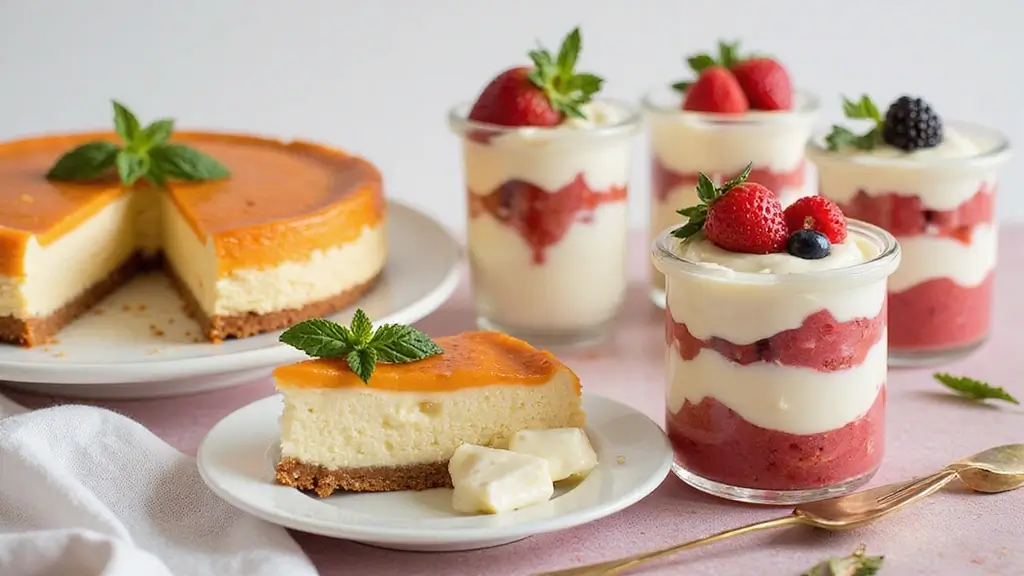
1. Creamy No-Bake Cheesecake

Are you craving a dessert that’s both creamy and easy to make? Look no further than this delightful No-Bake Cheesecake. It’s a classic favorite that blends rich flavors with a light texture, perfect for any occasion. The combination of evaporated milk and cream cheese creates a velvety filling, while the buttery graham cracker crust adds just the right crunch. You’ll impress your friends and family with minimal effort!
Servings: 8 | Prep Time: 15 minutes | Chill Time: 4 hours | Calories: 350 per slice
Here’s how to whip up this delicious cheesecake:
Ingredients:
– 1 ½ cups graham cracker crumbs
– ½ cup sugar
– ½ cup unsalted butter, melted
– 2 cups cream cheese, softened
– 1 cup evaporated milk
– 1 cup powdered sugar
– 1 teaspoon vanilla extract
Instructions:
1. Start by mixing graham cracker crumbs, sugar, and melted butter in a bowl.
2. Press this mixture into the bottom of a 9-inch springform pan to form a crust.
3. In another bowl, beat the softened cream cheese until it’s smooth. Gradually add in evaporated milk, powdered sugar, and vanilla, mixing until everything is well combined.
4. Pour the creamy filling over the crust, using a spatula to smooth the top.
5. Chill in the refrigerator for at least 4 hours until set.
This cheesecake tastes best when served chilled. Top it with fresh fruit or a drizzle of chocolate sauce to take it to the next level!
Tips:
– Ensure your cream cheese is at room temperature to avoid lumps.
– Experiment by adding fruit puree swirls for a fun twist in flavor and color.
Frequently Asked Questions:
– Can I use flavored gelatin for different flavors?
Absolutely! Flavored gelatin can add a fun twist to this classic dessert.
– How long does it keep?
This cheesecake can stay fresh for up to 5 days in the fridge.
Get ready to enjoy a dessert that’s creamy, delicious, and sure to be a hit at your next gathering!
Creamy No-Bake Cheesecake
Editor’s Choice


Graham Cracker Crumbs, Bulk Size (1.5 lb. Resealable Zip Lock Stand Up B…
2. Decadent Chocolate Mousse

Indulge in the ultimate chocolate experience with this delightful chocolate mousse. It’s rich, smooth, and incredibly easy to make. The secret ingredient? Evaporated milk. It gives the mousse that dreamy, creamy texture that turns every bite into pure bliss.
Imagine serving this luxurious dessert at your next dinner party. Guests will be impressed, and you’ll feel like a culinary genius. Plus, it’s perfect for special occasions or a cozy night in. Let’s dive into the recipe!
Overview:
Servings: 4 | Prep Time: 20 minutes | Total Time: 30 minutes | Calories: 450 per serving
Ingredients:
– 1 cup dark chocolate chips
– 1 cup evaporated milk
– ¼ cup sugar
– 1 teaspoon vanilla extract
– 2 large egg whites
– A pinch of salt
Instructions:
1. Start by melting the dark chocolate chips. Place them in a heatproof bowl over simmering water. Stir until it’s completely smooth.
2. In another bowl, whip the egg whites and salt until soft peaks form. Gradually add the sugar, and keep beating until you reach stiff peaks.
3. In a separate bowl, mix the evaporated milk and vanilla extract. Gently fold the melted chocolate into this mixture.
4. Carefully fold in the whipped egg whites. Take your time to keep the mixture light and airy.
5. Spoon the mousse into individual cups and refrigerate for at least an hour before serving.
Serve it up with a dollop of whipped cream and a sprinkle of chocolate shavings for an extra touch of elegance!
Tips:
– Choose high-quality chocolate for the best flavor.
– Be gentle when folding to maintain that airy texture.
– Store any leftovers in the fridge; it tastes even better the next day!
Frequently Asked Questions:
– Can I make this ahead of time? Yes! Prepare it a day in advance and chill it overnight.
– What if I don’t have dark chocolate? Milk chocolate works too, but expect a sweeter flavor.
Enjoy this luscious chocolate mousse that’s sure to impress anyone who loves chocolate!
Decadent Chocolate Mousse
Editor’s Choice

365 by Whole Foods Market, Dark Chocolate Baking Chunks, 12 Ounce

Hamilton Beach 6-Speed Electric Hand Mixer with Whisk, Traditional Beate…

Pyrex Essentials (3-Piece) Glass Mixing Bowls Set For Prepping, Baking a…
3. Vanilla Pudding Parfaits

Indulge in the creamy delight of Vanilla Pudding Parfaits! This dessert is not just a treat for your taste buds but a feast for the eyes as well. The rich pudding, made with evaporated milk, brings a silky texture that perfectly complements the crunchy layers of cookies and fresh fruit. Picture this: a clear glass showcasing beautiful layers of creamy pudding, vibrant berries, and crushed cookies. It’s no wonder why these parfaits are a hit on Pinterest!
Making these parfaits is a breeze. In just 15 minutes of prep time, you can whip up something that looks and tastes gourmet. Plus, the best part? You can customize them with your favorite fruits or cookies, making each parfait uniquely yours. They taste even better after chilling in the fridge, so they are perfect for preparing ahead of time.
Ingredients:
– 2 cups evaporated milk
– 1 cup sugar
– 1/3 cup cornstarch
– ½ teaspoon salt
– 2 teaspoons vanilla extract
– 1 cup crushed cookies (like Oreos)
– 1 cup fresh berries (strawberries, blueberries, or raspberries)
Instructions:
1. In a saucepan, combine the evaporated milk, sugar, cornstarch, and salt. Cook over medium heat while stirring until thickened.
2. Remove from heat and stir in the vanilla extract. Allow it to cool.
3. In your serving glasses, layer the pudding, crushed cookies, and fresh berries. Repeat the layers until the glasses are full.
4. Refrigerate for at least 2 hours before serving to let those flavors meld together.
These parfaits not only delight the palate but also create a colorful presentation that is sure to impress your guests!
Tips for Success:
– Make these parfaits a day ahead for deeper flavors.
– Use whipped cream or chocolate chips as additional toppings for extra flair.
– Experiment with different fruit combinations for seasonal variety.
– Consider using instant pudding if you’re short on time, but it may not have the same creamy texture as the cooked version.
With these easy steps, you’ll have a dessert that feels fancy yet is simple to make! Enjoy every spoonful of your Vanilla Pudding Parfaits!
Fun fact: parfaits built with evaporated milk stay ultra-silky, layer by layer, even after 2 hours in the fridge. Pro tip: stack 3 layers of pudding, cookies, and fruit for a crowd-pleasing, Pinterest-worthy dessert.
Vanilla Pudding Parfaits
Editor’s Choice

Sizikato 4pcs Clear Glass Dessert Cup, 6 Oz Custard Bowl, Pudding Cup, O…
4. Coconut Cream Pie

Indulge in a slice of paradise with this Coconut Cream Pie! It’s a sweet escape for coconut lovers. The rich, creamy filling made with evaporated milk creates a texture that melts in your mouth. Picture this: a buttery crust cradling a luscious coconut mixture, all topped with fluffy whipped cream and toasted coconut flakes. Each bite tastes like a warm, sunny day on a tropical beach.
Ready to make this delightful treat? Here’s a simple recipe that will impress your family and friends. It takes just 20 minutes to prepare, but you’ll need to chill it for a few hours before serving. Trust us; the wait is worth it!
Ingredients:
– 1 pre-made pie crust
– 1 cup evaporated milk
– 1 cup sweetened shredded coconut
– 3/4 cup granulated sugar
– 1/3 cup cornstarch
– 4 large egg yolks
– 1 teaspoon vanilla extract
– 1 cup heavy whipping cream (for topping)
Instructions:
1. In a saucepan, combine the evaporated milk, sugar, cornstarch, and egg yolks. Cook on medium heat, stirring constantly until it thickens.
2. Remove from heat and stir in the shredded coconut and vanilla extract. Pour this mixture into the pre-made pie crust and smooth the top.
3. Cover and refrigerate for at least 3 hours until set.
4. Just before serving, whip the heavy cream until soft peaks form. Spread it over the pie and sprinkle with toasted coconut for garnish.
This Coconut Cream Pie is not just a dessert; it’s a celebration of flavors and textures!
Tips: Want to add a bit more crunch? Toast the coconut in the oven for a few minutes before garnishing.
Frequently Asked Questions:
– Can I use unsweetened coconut?
Yes, you can! It will be less sweet but still delicious.
– How should I store leftovers?
Keep it covered in the fridge for up to 3 days.
Get ready to transport yourself to a tropical island with every delicious slice!
Coconut Cream Pie
Editor’s Choice

Keebler Ready Crust 10-Inch Graham Cracker Pie Crust, Premade Pie Crust …

Amazon Grocery, Heavy Whipping Cream, Ultra-Pasteurized, 16 Fl Oz (Previ…

365 by Whole Foods Market, Organic Shredded Coconut, 8 Ounce (Pack of 2)
5. Butterscotch Pudding

Indulge in the velvety goodness of butterscotch pudding. This dessert is a classic that brings warmth and nostalgia to any table. With the addition of evaporated milk, this recipe elevates the creaminess to new heights. You can serve it on its own or use it as a delightful filling for cakes and pies.
Overview:
Servings: 4 | Prep Time: 10 minutes | Chill Time: 1 hour | Calories: 250 per serving
Here’s what you’ll need to create this mouthwatering treat:
Ingredients:
– 1 cup evaporated milk
– 1 cup brown sugar
– 1/3 cup cornstarch
– ¼ teaspoon salt
– 2 tablespoons butter
– 1 teaspoon vanilla extract
Instructions:
1. In a medium saucepan, mix the evaporated milk, brown sugar, cornstarch, and salt. Heat over medium, stirring constantly until it thickens.
2. Remove from heat and stir in the butter and vanilla until smooth.
3. Pour the mixture into serving dishes and refrigerate for at least 1 hour until set.
For a special touch, top your pudding with whipped cream or a dash of cinnamon!
Tips:
– Use dark brown sugar for a deeper flavor.
– Make this pudding a day ahead; it keeps well in the fridge for 3-4 days.
– Add a hint of whiskey or rum extract to enhance the taste.
Every bite of this homemade butterscotch pudding brings comfort and joy. You’ll love how easy it is to make and how it impresses your friends and family!
Butterscotch Pudding
Editor’s Choice


EurKitchen Professional Aluminum Whipped Cream Dispenser – Leak-Free Whi…
6. Key Lime Pie

Dive into the delightful world of key lime pie, where sweet meets tart in a creamy explosion of flavor. This refreshing dessert transports you to the tropics with every bite. Imagine a smooth filling, perfectly balanced and enriched with evaporated milk, nestled in a crunchy graham cracker crust. It’s the ideal treat for warm summer days or any time you crave a burst of citrus joy.
You can whip this pie up in just 15 minutes, but it does need some chill time in the fridge for the flavors to fully develop. It’s a showstopper that’s easy to make, even for beginners. Plus, it’s a crowd-pleaser at any gathering, leaving everyone asking for seconds.
Ingredients:
– 1 pre-made graham cracker pie crust
– 1 cup key lime juice
– 1 can (14 oz) sweetened condensed milk
– ½ cup evaporated milk
– 4 large egg yolks
– 1 tablespoon lime zest
Instructions:
1. Preheat your oven to 350°F (175°C).
2. In a bowl, whisk together the key lime juice, sweetened condensed milk, evaporated milk, egg yolks, and lime zest until smooth.
3. Pour this mixture into the graham cracker crust. Bake for 10 minutes.
4. Remove from the oven and let it cool. Then, refrigerate for at least 3 hours before serving.
For a lovely finish, top your slices with whipped cream and a sprinkle of lime zest. It not only looks beautiful but adds an extra zing.
Tips:
– Use fresh key limes if you can find them; they make a big difference in taste.
– Substitute regular limes if you can’t find key limes, but expect a slightly different flavor.
– Store leftovers in the refrigerator for up to 3 days, but good luck with that!
Enjoy the bright, zesty flavor of this key lime pie, and watch it become a favorite in your recipe collection!
Key Lime Pie
Editor’s Choice

CARGEN Pie Crust Shield, Adjustable Pie Crust Covers for Edges of Pie Si…

Eagle Brand Sweetened Condensed Milk, 14 oz (Pack of 4)

Professional Aluminum Whipped Cream Dispenser – 500 mL/1 Pint,Whipped Cr…
7. Strawberry Shortcake

Indulge in the delightful taste of strawberry shortcake, a must-have summer dessert! This treat combines fresh strawberries, fluffy biscuits, and a heavenly whipped cream topping. The secret? Adding evaporated milk to the whipped cream for a luxurious, creamy texture that takes this classic dessert to the next level.
Here’s how to create this easy and delicious dessert in no time. You’ll serve six people with a prep time of just 20 minutes and a total time of 30 minutes. Each serving is about 250 calories, making it a sweet treat you can enjoy guilt-free!
Ingredients:
– 2 cups fresh strawberries, sliced
– 1/4 cup sugar (for strawberries)
– 2 cups all-purpose flour
– 1 tablespoon baking powder
– 1/2 teaspoon salt
– 1/4 cup cold butter, cubed
– 3/4 cup evaporated milk
– 1 cup heavy whipping cream
Instructions:
1. Start by tossing sliced strawberries with sugar in a bowl. Let them sit for about 10 minutes to release their juices.
2. Preheat your oven to 425°F (220°C). In a mixing bowl, combine flour, baking powder, and salt. Cut in the cold butter until the mixture looks like coarse crumbs.
3. Stir in the evaporated milk until a dough forms. Transfer the dough to a floured surface and knead gently. Roll it out and cut into rounds.
4. Bake the biscuits for 10-12 minutes until they turn golden brown. Let them cool.
5. Whip the heavy cream until soft peaks form. Gently fold in the evaporated milk for an extra creamy touch.
6. To assemble, cut the biscuits in half, layer them with strawberries, and top with the whipped cream.
Serve this delightful strawberry shortcake immediately for a refreshing summer dessert!
Tips:
– Use ripe strawberries for the best flavor.
– Add a splash of vanilla extract to the whipped cream for an extra flavor boost.
Frequently Asked Questions:
– Can I prepare the biscuits ahead of time?
Yes, make them a day in advance and store them in an airtight container.
– What other fruits can I use?
Peaches or blueberries work wonderfully as alternatives!
This strawberry shortcake will be the highlight of any summer gathering!
Strawberry Shortcake
Editor’s Choice

365 By Whole Foods Market, Heavy Whipping Cream, 32 Fl Oz

Clabber Girl Double Acting Baking Powder, 8.1 Ounce
8. Pumpkin Pie

Pumpkin pie is a timeless dessert that warms hearts every fall. The creamy filling, made rich with evaporated milk, is a delightful blend of sweet pumpkin and aromatic spices. This dessert not only looks beautiful on your table but also fills your home with comforting scents. Imagine slicing into a perfectly baked pie, the smooth filling glistening, inviting everyone to take a bite.
Ready to impress this holiday season? Let’s get started on this simple yet delicious pumpkin pie recipe. With just a few ingredients, you’ll create a dessert that everyone will talk about long after dinner. Plus, it’s quick to prepare, so you can spend more time with loved ones. Here’s everything you need to know.
Ingredients:
– 1 pre-made pie crust
– 1 can (15 oz) pumpkin puree
– 1 cup evaporated milk
– ¾ cup sugar
– 2 large eggs
– 1 teaspoon cinnamon
– ½ teaspoon nutmeg
– ½ teaspoon allspice
Instructions:
1. Preheat your oven to 425°F (220°C).
2. In a large mixing bowl, combine the pumpkin puree, evaporated milk, sugar, eggs, and spices. Whisk until smooth and creamy.
3. Pour the mixture into the pie crust, spreading it evenly.
4. Bake for 15 minutes in the hot oven.
5. Lower the temperature to 350°F (175°C) and bake for an additional 35-40 minutes, or until the filling is set and a knife inserted comes out clean.
6. Allow the pie to cool before slicing. Serve with a dollop of whipped cream for extra indulgence.
Tips: For an even silkier texture, strain the pumpkin puree before mixing it in.
Frequently Asked Questions:
– Can I use fresh pumpkin?
Yes! Just make sure it’s well-cooked and pureed to match the consistency of canned pumpkin.
– How do I store leftovers?
Keep your pie covered in the fridge for up to 4 days.
This pumpkin pie is not just a dessert; it’s a warm hug in a slice. Perfect for family gatherings or cozy nights in, this classic will surely satisfy everyone’s sweet tooth!
Pumpkin Pie
Editor’s Choice
EurKitchen Professional Aluminum Whipped Cream Dispenser – Leak-Free Whi…

Libby 100% Pure Pumpkin, 29 oz. (29 Ounce(3 pack) (29 Ounce(3 Pack))
9. Chocolate Chip Cookie Dough Dip

Dive into a creamy delight with this Chocolate Chip Cookie Dough Dip. It captures the heart of classic cookie dough but in a fun, shareable format. Perfect for gatherings or cozy nights in, this dip uses evaporated milk to create a rich, smooth texture that you won’t be able to resist.
Overview:
Servings: 8 | Prep Time: 10 minutes | Total Time: 10 minutes | Calories: 250 per serving
This dip pairs wonderfully with graham crackers, fresh fruits, or even pretzels. It’s designed for dipping, making it a perfect snack for any occasion!
Ingredients:
– 1 cup brown sugar
– ½ cup unsalted butter, softened
– 1 cup flour (heat-treated if preferred)
– 1 teaspoon vanilla extract
– ½ cup evaporated milk
– 1 cup mini chocolate chips
Instructions:
1. Start by creaming together the brown sugar and softened butter in a large mixing bowl until smooth and fluffy.
2. Gradually mix in the flour and evaporated milk, blending until well combined.
3. Add the vanilla extract and mini chocolate chips, stirring until everything is nicely mixed.
4. Transfer the dip to a serving bowl and set out your favorite dippers like graham crackers, pretzels, or apple slices!
This no-bake treat lets you enjoy cookie dough flavors without the wait.
Tips:
– If you’re concerned about eating raw flour, heat-treat it by microwaving for 1 minute before using.
– This dip can be made ahead of time; it actually tastes better after resting in the fridge for a while.
Frequently Asked Questions:
– How long does this dip last? Store it covered in the refrigerator for up to 3 days.
– Can I make it ahead of time? Yes! Making it in advance allows the flavors to meld beautifully.
This delightful dip is sure to impress your friends and family, making it a must-try for your next gathering!
Chocolate Chip Cookie Dough Dip
Editor’s Choice

Umite Chef Mixing Bowls with Airtight Lids Set, 8PCS Stainless Steel Kha…

5 Pieces Silicone Spatula Set, Food Grade Rubber Spatula, Upgrade Strong…
10. Rice Pudding

Indulge in the warm embrace of homemade rice pudding, a dessert that brings back memories of cozy family dinners. With the addition of evaporated milk, this classic recipe takes on a rich and creamy texture that you’ll crave. Whether you enjoy it warm on a chilly evening or chilled on a hot day, this pudding is sure to satisfy your sweet tooth.
Overview:
– Servings: 6
– Prep Time: 10 minutes
– Cooking Time: 30 minutes
– Calories: 200 per serving
This delightful treat is flavored with cinnamon and nutmeg, making each spoonful a comforting experience. Plus, it’s simple to prepare, so you can whip it up any time you want a sweet escape.
Ingredients:
– 1 cup Arborio rice
– 2 cups water
– 1 can (12 oz) evaporated milk
– 1/2 cup sugar
– 1 teaspoon vanilla extract
– 1/4 teaspoon cinnamon
– A pinch of salt
Instructions:
1. In a medium saucepan, mix the Arborio rice and water. Bring it to a boil, then lower the heat and let it simmer until the rice is tender, about 15 minutes.
2. Add in the evaporated milk, sugar, vanilla extract, cinnamon, and salt. Stir well and cook over low heat. Keep stirring until the mixture thickens, which should take about 15-20 minutes.
3. Once thickened, remove the saucepan from heat and let it cool slightly before serving.
Serve your rice pudding warm or chilled, and finish it off with a sprinkle of cinnamon for extra flavor!
Tips for Enjoying:
– Store leftovers in the fridge for up to 5 days for an easy breakfast or snack.
– Experiment with toppings like fresh fruit, nuts, or whipped cream for added flair.
– Try different rice types if you want to switch things up, just remember that the texture may vary.
Frequently Asked Questions:
– Can I use a different type of rice? Yes, white rice works, but the texture will change.
– Is it better warm or cold? Both! Each offers a different vibe, so try it both ways.
Enjoy this comforting rice pudding any time you need a little sweetness in your life!
Rice Pudding
Editor’s Choice

Amazon Grocery, Ground Cinnamon, 2.5 Oz (Previously Happy Belly, Packagi…
11. No-Bake Chocolate Lasagna

Indulge in a dessert that combines two favorites: chocolate and lasagna! This no-bake chocolate lasagna is a crowd-pleaser, featuring rich layers of chocolate pudding, creamy filling, and fluffy whipped cream. The secret ingredient, evaporated milk, adds a silky texture that will have everyone coming back for seconds. Perfect for potlucks or family gatherings, this dessert is as stunning as it is delicious!
Creating this dessert is simple and quick. With just 30 minutes of prep time, you’ll have a delightful treat ready to chill. Let it sit for about 4 hours, and you’ll be rewarded with a mesmerizing layered dessert that looks impressive and tastes divine.
Ingredients:
– 1 package (15 oz) Oreo cookies, crushed
– ½ cup butter, melted
– 1 package (8 oz) cream cheese, softened
– 1 cup powdered sugar
– 1 cup evaporated milk
– 2 packages (3.9 oz each) instant chocolate pudding mix
– 3 cups whipped topping (like Cool Whip)
Instructions:
1. In a bowl, mix the crushed Oreos with melted butter until well combined. Press this mixture into the bottom of a 9×13 inch dish to form a crust.
2. In a separate bowl, beat the softened cream cheese and powdered sugar until smooth. Gently fold in 1 cup of whipped topping, then spread this mixture over the Oreo crust.
3. In another bowl, whisk together the instant chocolate pudding mix and evaporated milk until it thickens. Spread this layer over the cream cheese filling.
4. Top with the remaining whipped topping and refrigerate for at least 4 hours before serving.
Serve this chilled dessert to impress your guests! It’s rich, creamy, and utterly satisfying.
Tips:
– Add chocolate shavings or crushed Oreos on top for a beautiful finish.
– Make it a day in advance for even better flavor.
– This dessert stays fresh in the fridge for up to 5 days, but it’s best enjoyed right after chilling.
This no-bake chocolate lasagna is a chocolate lover’s dream. You won’t just be serving dessert; you’ll be creating memories!
No-Bake Chocolate Lasagna
Editor’s Choice


Amazon Grocery, Original Whipped Topping, 16 Oz, Frozen (Previously Amaz…
12. Peppermint Bark

Peppermint bark is a holiday treat that brings joy and cheer to any gathering. It combines rich chocolate with refreshing peppermint, creating a perfect blend of flavors. The secret to its creamy texture? Evaporated milk! This simple ingredient elevates the bark, making it silky and indulgent.
Imagine serving this delightful dessert at your next party or giving it as a thoughtful gift. It looks beautiful with its distinct layers, and you can easily make it in just a couple of hours. Plus, it’s a crowd-pleaser that appeals to both kids and adults alike!
Ready to make your own peppermint bark? Here’s what you need:
Ingredients:
– 12 oz semi-sweet chocolate chips
– 12 oz white chocolate chips
– 1 can (12 oz) evaporated milk
– 1 cup crushed peppermint candy
Instructions:
1. Start by melting the semi-sweet chocolate chips. You can do this in the microwave or use a double boiler. Stir in the evaporated milk until the mixture is smooth and creamy.
2. Spread this melted chocolate onto a parchment-lined baking sheet. Refrigerate it until firm, which should take about 30 minutes.
3. Next, melt the white chocolate chips. Once melted, pour it over the chilled chocolate layer and use a spatula to spread it evenly.
4. Sprinkle the crushed peppermint candy on top of the white chocolate layer. Refrigerate again until fully set, which will take about another hour.
5. Once hardened, break the bark into pieces and serve!
This peppermint bark is not just delicious; it’s also super easy to make. You can customize it too! Want to mix things up? Try using milk chocolate or adding your favorite nuts for a different twist.
Tips:
– Use high-quality chocolate for the best taste.
– Store in an airtight container for up to two weeks.
– Get creative with flavors; experiment with different chocolates or toppings!
– Package it beautifully for an impressive gift.
This festive treat captures the spirit of the season, making it perfect for sharing, gifting, or enjoying yourself. Dive into this recipe and create a sweet memory today!
Peppermint Bark
Editor’s Choice

Amazon Fresh, Chocolate Baking Chips, Semi Sweet, 24 Oz, 1.5 Lb (Pack of…

Hershey’s Premier White Baking Chips – 12 oz – 2 pk

200Pcs Parchment Paper,12×16 Inches Non-Stick Precut Parchment Paper She…
13. No-Bake Tiramisu

Indulge in this delightful no-bake tiramisu, a simple yet elegant twist on the beloved Italian classic. With layers of coffee-soaked ladyfingers and a rich mascarpone filling enhanced by evaporated milk, this dessert is a dreamy treat for coffee aficionados. Whether you’re hosting a dinner party or treating yourself, this creamy dessert is sure to impress.
Overview:
Servings: 8 | Prep Time: 30 minutes | Total Time: 4 hours (including chilling) | Calories: 350 per serving
Imagine the luscious flavors of coffee and creamy mascarpone melting in your mouth. This no-bake tiramisu is not just easy to make, but it’s also a showstopper that will leave your guests wanting more.
Ingredients:
– 1 package (7 oz) ladyfinger cookies
– 1 cup strong brewed coffee, cooled
– 1 cup mascarpone cheese
– ½ cup sugar
– 1 cup evaporated milk
– 1 teaspoon vanilla extract
– Cocoa powder for dusting
Instructions:
1. Quickly dip each ladyfinger into the cooled coffee, then layer them at the bottom of a dish.
2. In a bowl, mix mascarpone cheese, sugar, evaporated milk, and vanilla extract. Beat until the mixture is smooth and creamy.
3. Spread half of this mascarpone mixture over the ladyfingers. Layer more dipped ladyfingers on top, followed by the remaining mascarpone filling.
4. Cover your dish and refrigerate for at least 4 hours, or overnight for best results.
5. Before serving, dust the top with cocoa powder for that classic finish.
This tiramisu is not just creamy and dreamy; it’s an experience! For an added flavor boost, consider splashing in some coffee liqueur.
Tips:
– Try using instant coffee in a pinch, but fresh brewed coffee gives the best flavor.
– Store leftovers in the fridge for up to 4 days, but good luck keeping it that long!
Treat yourself and your guests to this decadent no-bake tiramisu. It’s easy, delicious, and guaranteed to be a hit at any gathering!
No-Bake Tiramisu
Editor’s Choice


Savoiardi Gabriella Italian Lady Fingers – Lady Fingers for Tiramisu Mad…
14. Blueberry Fool

Blueberry Fool is a delightful treat that offers a light and airy texture. This no-bake dessert combines the freshness of juicy blueberries with the creaminess of whipped cream and evaporated milk. The result? A rich and satisfying dessert that feels indulgent but is easy to whip up!
Imagine the sweet-tart burst of blueberries mingling with a velvety cream. It’s perfect for ending a meal or enjoying on a warm afternoon. Plus, you can make it in just about 15 minutes!
Here’s how to make it:
Overview:
Servings: 4 | Prep Time: 15 minutes | Total Time: 1 hour (including chill time) | Calories: 180 per serving
Ingredients:
– 2 cups fresh blueberries
– ¼ cup sugar
– 1 cup evaporated milk
– 1 cup heavy whipping cream
– 1 teaspoon vanilla extract
Instructions:
1. In a saucepan, cook the blueberries and sugar over medium heat. Stir until the blueberries burst and the mixture thickens slightly, about 5 minutes. Let it cool down.
2. In a separate bowl, whip the heavy cream until stiff peaks form. In another bowl, whisk together the evaporated milk and vanilla extract until smooth.
3. Gently fold the whipped cream into the evaporated milk mixture. Then, swirl in the cooled blueberry mixture.
4. Spoon the dessert into serving dishes and refrigerate for at least 1 hour to chill.
Serve this refreshing dessert cold and watch it disappear at your next gathering!
Tips:
– Feel free to mix in other berries like raspberries or strawberries for a colorful twist!
– If you want to save time, you can use frozen blueberries; just remember the texture might be a bit different.
– This dessert stays fresh in the fridge for up to 3 days, making it great for meal prep!
– For a fun presentation, top with extra whipped cream and a few whole blueberries.
Enjoy this easy dessert that’s perfect any time of year!
Blueberry Fool
Editor’s Choice
Amazon Grocery, Heavy Whipping Cream, Ultra-Pasteurized, 16 Fl Oz (Previ…

Whole milk powder By Medley Hills Farm in Reusable Container 1 lb. – Gre…
Umite Chef Mixing Bowls with Airtight Lids Set, 8PCS Stainless Steel Kha…
15. Chocolate Coconut Truffles

Indulge your sweet tooth with these heavenly chocolate coconut truffles. They are rich, creamy, and bursting with coconut flavor, making them a delightful treat for any chocolate lover. The addition of evaporated milk gives these truffles a smooth texture that melts in your mouth. Whether you’re hosting a gathering or just treating yourself, these truffles will impress everyone!
Here’s how to make them. You’ll need just a few simple ingredients, and in no time, you’ll have a batch of truffles ready to enjoy. These little bites of joy are also perfect for gifting. Wrap them up in a cute box, and they make a thoughtful present for friends and family.
Ingredients:
– 1 cup semi-sweet chocolate chips
– ½ cup evaporated milk
– 1 cup sweetened shredded coconut
– 1 teaspoon vanilla extract
Instructions:
1. Start by melting the chocolate chips and evaporated milk together in a saucepan over low heat. Stir continuously until the mixture is smooth and creamy.
2. Next, remove the pan from heat and mix in the shredded coconut and vanilla extract until fully combined.
3. Allow the mixture to cool slightly. Then, scoop out small portions and roll them into balls with your hands.
4. Place the truffles on a parchment-lined baking sheet. Refrigerate them for at least 30 minutes to firm up.
Enjoy these truffles as a quick snack or a sweet finish to your meal. They are sure to satisfy any chocolate craving!
Tips:
– Roll the truffles in extra coconut or cocoa powder for a fun twist.
– Use dark chocolate for a deeper flavor.
– Store in an airtight container in the fridge for up to two weeks for the best taste.
These truffles are not just delicious; they’re also super easy to make. Treat yourself and your loved ones with these delightful bites!
Chocolate Coconut Truffles
Editor’s Choice

Amazon Basics Silicone Rectangular Baking Mat, Non-Stick Reusable Oven B…

Wilton Candy Melts Melting Pot, Perfect for Dipping, Drizzling & Decorat…

Lindt Gourmet Chocolate Truffles Gift Box, Assorted Chocolate Candy for …
16. S’mores Dip

Bring the joy of campfire s’mores right into your home with this delightful s’mores dip! This dessert captures the classic flavors of s’mores while using evaporated milk to create a creamy, indulgent treat that everyone will love. It’s perfect for gatherings or cozy nights in, where you want to impress without the fuss.
Overview:
Servings: 8 | Prep Time: 10 minutes | Total Time: 20 minutes | Calories: 250 per serving
Ingredients:
– 1 cup semi-sweet chocolate chips
– 1 cup mini marshmallows
– ½ cup evaporated milk
– 1 cup graham cracker crumbs (for dipping)
Instructions:
1. Start by preheating your oven to 350°F (175°C).
2. In a baking dish, blend the chocolate chips and evaporated milk. Make sure they are well mixed.
3. Top the mixture with mini marshmallows, spreading them evenly.
4. Bake for about 10 minutes or until the marshmallows are golden brown and the chocolate is perfectly melted.
5. Serve warm with graham cracker crumbs for dipping!
This warm and gooey dip is sure to be a crowd-pleaser. The texture is rich and satisfying, making it a hit for any occasion.
Tips:
– Add a drizzle of caramel sauce on top for an extra layer of sweetness.
– Pair with fresh fruit for a fun twist on dipping.
Frequently Asked Questions:
– How long can I keep leftovers?
This dip is best enjoyed fresh. However, if you have leftovers, store them in the fridge for up to 2 days.
Now, gather your friends and family around this s’mores dip for a sweet experience that rivals the campfire classic! Enjoy the fun and flavor!
S’mores Dip
Editor’s Choice


HONEY MAID Graham Crackers, Lunch Snacks, Party Size, 28.8 oz
17. Chocolate Meringue Pie

Indulge in a classic treat with a delightful twist: Chocolate Meringue Pie. This dessert features a velvety chocolate filling that marries beautifully with a light, fluffy meringue. The secret to its rich, creamy texture? Evaporated milk! It’s a dessert that promises to wow chocolate lovers and impress your guests.
Imagine slicing into a pie that combines the deep, luscious taste of chocolate with a cloud-like topping. The contrast of textures makes every bite a celebration. Plus, it’s simple enough to prepare in just an hour, including cooling time.
Overview:
– Servings: 8
– Prep Time: 20 minutes
– Total Time: 1 hour (including cooling)
– Calories: 350 per slice
Ingredients:
– 1 pre-made pie crust
– 1 cup sugar
– 1/2 cup unsweetened cocoa powder
– 3 tablespoons cornstarch
– 1/8 teaspoon salt
– 2 cups evaporated milk
– 4 large egg yolks
– 2 teaspoons vanilla extract
– 4 large egg whites
– 1/4 teaspoon cream of tartar
Instructions:
1. Preheat your oven to 350°F (175°C).
2. In a saucepan, mix sugar, cocoa powder, cornstarch, salt, and evaporated milk. Cook on medium heat until the mixture thickens, stirring frequently.
3. Remove from heat. Stir in egg yolks and vanilla extract until smooth.
4. Pour this rich filling into your pie crust.
5. In a separate bowl, beat egg whites and cream of tartar until stiff peaks form. Spread the meringue over the chocolate filling.
6. Bake for about 10 minutes, or until the meringue is golden brown.
Let the pie cool completely before slicing. This cooling step ensures the filling sets perfectly.
Tips:
– For a deeper chocolate flavor, add a teaspoon of coffee to the filling.
– Store leftovers in the fridge for up to three days.
Frequently Asked Questions:
– How do I store leftovers? Keep them in the refrigerator for up to three days to maintain freshness.
– Can I freeze this pie? Freezing is not recommended, especially because of the meringue topping.
Treat yourself to this Chocolate Meringue Pie, a dessert that balances richness and lightness perfectly. It’s a wonderful way to end any meal, leaving everyone wanting more!
Chocolate Meringue Pie
Editor’s Choice

Mrs. Anderson’s Baking Easy No-Mess Pie Crust Maker Bag, BPA Free, Rolls…
Hamilton Beach 6-Speed Electric Hand Mixer with Whisk, Traditional Beate…
18. Pecan Pie

Pecan pie is a classic dessert that warms the heart, especially during holidays. This sweet and nutty treat shines with a rich filling made creamy by evaporated milk. The combination of smooth custard and crunchy pecans creates a delightful contrast that is simply irresistible. Whether you’re hosting a family gathering or just treating yourself, this pecan pie is sure to impress!
Overview:
Servings: 8 | Prep Time: 10 minutes | Total Time: 1 hour (including baking) | Calories: 300 per slice
Ingredients:
– 1 pre-made pie crust
– 1 cup corn syrup
– 1 cup brown sugar
– ½ cup evaporated milk
– 3 large eggs
– 1 teaspoon vanilla extract
– 1 ½ cups pecans
Instructions:
1. Start by preheating your oven to 350°F (175°C).
2. In a large mixing bowl, whisk together the corn syrup, brown sugar, evaporated milk, eggs, and vanilla extract until the mixture is smooth and well combined.
3. Fold in the pecans, ensuring they are evenly distributed throughout the filling.
4. Pour the filling into the pie crust and spread it out evenly.
5. Bake the pie for 50-60 minutes. It’s done when the filling is set, but still has a slight jiggle in the center. Let it cool before slicing.
This pie pairs perfectly with a scoop of vanilla ice cream or a dollop of whipped cream for added indulgence.
Tips:
– Serve warm for a cozy experience.
– Top with whipped cream for extra sweetness.
– Store leftovers in the fridge for up to 4 days, ensuring they are covered.
Frequently Asked Questions:
– Can I use a homemade pie crust?
Absolutely! A homemade crust adds a personal touch and enhances the flavor.
– How should I store leftovers?
Keep them covered in the refrigerator for up to 4 days to maintain freshness.
Dive into this nutty goodness and create lasting memories with every slice! Enjoy your baking adventure!
Pecan pie shows how simple ingredients like evaporated milk, crunchy pecans, and a touch of vanilla can turn a quiet moment into a cozy holiday memory. Bake with love, slice generously, and savor the creamy richness.
Pecan Pie
Editor’s Choice

Wholly Wholesome, Pie Shells, Traditional, 2 Count , 14 oz (Frozen)

Beyond Good , Pure Extract, Vanilla, 4 Fl Oz
EurKitchen Professional Aluminum Whipped Cream Dispenser – Leak-Free Whi…
19. Mango Mousse

Mango mousse brings a taste of the tropics right to your kitchen. It’s light, fruity, and oh-so-refreshing, making it an ideal dessert for warm days. Thanks to the rich texture of evaporated milk, this mousse becomes incredibly creamy and smooth—perfect for impressing your guests!
Overview:
Servings: 6 | Prep Time: 15 minutes | Chill Time: 2 hours | Calories: 180 per serving
This dessert showcases fresh mangoes beautifully, and its vibrant color adds a pop of joy to any table. Here’s how you can make your very own mango mousse!
Ingredients:
– 2 cups ripe mango pulp (fresh or canned)
– 1 cup evaporated milk
– 1/2 cup sugar
– 1 teaspoon vanilla extract
– 1 tablespoon lemon juice
– 1 cup whipped cream (for topping)
Instructions:
1. In a blender, mix the mango pulp, evaporated milk, sugar, vanilla extract, and lemon juice. Blend until the mixture is smooth and creamy.
2. In a separate bowl, whip the cream until you see soft peaks form. This adds a lovely lightness to your mousse.
3. Gently fold the mango mixture into the whipped cream. Be careful not to deflate the cream too much; you want it airy and fluffy!
4. Spoon the mixture into serving cups. Refrigerate for at least 2 hours to let it set properly.
Before serving, top your mousse with a dollop of whipped cream or some fresh mango slices for a beautiful finish!
Tips:
– Adapt the sweetness based on how ripe your mango is; sweeter mangoes need less sugar!
– You can use frozen mango if fresh isn’t available. Just ensure it’s thawed and well-drained.
Frequently Asked Questions:
– Can I use frozen mango?
Yes! Just make sure it’s thawed and well-drained before blending.
– How long does it last?
This mango mousse keeps well in the fridge for up to 3 days.
Enjoy this delightful dessert that feels like a treat from a tropical paradise! It’s easy to make and sure to bring smiles all around.
Mango Mousse
Editor’s Choice

Ninja BN701 Professional Plus Blender, 1400 Peak Watts, 3 Functions for …

NileHome Stainless Steel Whisk Set 8″ 10″ 12″ Kitchen Whisk Balloon Whis…
20. Lemon Chiffon Pie

Indulge in the delightful taste of Lemon Chiffon Pie, a dessert that perfectly balances sweet and tart flavors. This light and fluffy pie is a refreshing treat, especially on warm days. With its creamy texture enhanced by evaporated milk, it feels like a little slice of sunshine on your plate.
Overview:
Servings: 8 | Prep Time: 20 minutes | Total Time: 4 hours (chill time included) | Calories: 250 per slice
This pie shines as a go-to dessert for summer gatherings or family picnics.
Ingredients:
– 1 pre-made pie crust
– 1 cup sugar
– 1/3 cup cornstarch
– ½ teaspoon salt
– 1 cup water
– ¾ cup fresh lemon juice
– 4 large egg yolks
– 1 can (12 oz) evaporated milk
– 4 large egg whites
Instructions:
1. In a saucepan, whisk together the sugar, cornstarch, and salt. Gradually mix in the water and lemon juice. Cook this mixture over medium heat until it thickens.
2. Take it off the heat and whisk in the egg yolks and evaporated milk until it’s smooth.
3. Pour this delicious mixture into your pie crust. Let it cool, then refrigerate for at least 3 hours to set.
4. Beat the egg whites until stiff peaks form. Spread them over the pie and bake at 350°F (175°C) for 10 minutes until golden brown.
Serve this pie chilled for a burst of citrusy delight!
Tips:
– Use fresh lemon juice for the best flavor.
– Store leftovers in the fridge, covered, for up to 3 days.
This Lemon Chiffon Pie is not just a dessert; it’s a refreshing experience that brightens any occasion. Enjoy every creamy, zesty bite!
Lemon Chiffon Pie
Editor’s Choice
Mrs. Anderson’s Baking Easy No-Mess Pie Crust Maker Bag, BPA Free, Rolls…

Peak Evaporated Full Cream Milk, 13 Fl. Oz. (Pack Of 4)

Elite Gourmet ETS740 BPA-Free Electric Citrus Juicer with 2 Cones, Compa…
21. Chocolate Chip Ice Cream

Indulge in the creamy delight of homemade chocolate chip ice cream, a timeless favorite that promises smiles all around. Imagine a bowl filled with smooth, rich ice cream, bursting with chocolatey goodness. With evaporated milk, this treat achieves a velvety texture that sets it apart. Whether you scoop it into a cone or serve it in a bowl, this refreshing dessert is perfect for warm afternoons or cozy evenings.
Ready to whip up your own batch? It’s easier than you think! Here’s what you need and how to do it. Gather your ingredients, and get ready for a sweet adventure.
Ingredients:
– 2 cups heavy cream
– 1 cup evaporated milk
– 1 cup sugar
– 1 teaspoon vanilla extract
– 1 cup chocolate chips
Instructions:
1. In a large bowl, combine heavy cream, evaporated milk, sugar, and vanilla extract. Stir until the sugar completely dissolves.
2. Pour this mixture into your ice cream maker and churn according to the manufacturer’s instructions. You’ll want it to become thick and creamy.
3. In the last few minutes of churning, gently fold in the chocolate chips for that extra burst of flavor.
4. Transfer the ice cream to an airtight container. Freeze it for at least 4 hours or until firm.
Enjoy your ice cream in a bowl or cone! Sprinkle some extra chocolate chips on top for a decadent touch.
Tips:
– If you don’t own an ice cream maker, no worries! Pour the mixture into a shallow dish. Stir it every 30 minutes until it reaches the desired consistency.
– Feel free to get creative. Add nuts, fruit, or your favorite candies for a fun twist!
Frequently Asked Questions:
– How long can I keep this ice cream? Store it in the freezer for up to 2 weeks for the best flavor.
– Can I play with the ingredients? Absolutely! Mix in your favorite toppings and flavors to make it uniquely yours.
Dive into this delightful treat and make every occasion a bit sweeter!
Fun fact: dessert recipes using evaporated milk create a velvety ice cream base with less churn time. Chill the mixture, churn briefly, and you’ll scoop rich, chocolate-chip bliss in minutes.
Chocolate Chip Ice Cream
Editor’s Choice

Cuisinart Ice Cream Maker Machine, 1.5 Quart Double Insulated Machine, S…

Tovolo Glide-A-Scoop Reusable Ice Cream Tub, Sunburst – Airtight BPA-Fre…
5 Pieces Silicone Spatula Set, Food Grade Rubber Spatula, Upgrade Strong…
22. Taffy Apple Salad

Indulge in the delightful world of Taffy Apple Salad, a sweet, creamy treat that’s sure to be a hit at any gathering. This unique dessert combines the crispness of fresh apples with the rich flavor of caramel, all wrapped up in a smooth, creamy base. The addition of evaporated milk brings a luscious texture that makes each bite irresistible.
Perfect for potlucks or family dinners, this dessert is not only delicious but also incredibly simple to whip up. With just a few ingredients and minimal prep time, you can create a dish that will impress your friends and family. Plus, it’s a great way to use apples, making it both seasonal and satisfying.
Overview:
Servings: 8 | Prep Time: 15 minutes | Total Time: 1 hour (including chilling) | Calories: 210 per serving
Ingredients:
– 4 cups chopped apples
– 1 cup evaporated milk
– 1 cup sugar
– 1 cup mini marshmallows
– 1 cup chopped nuts (like pecans or walnuts)
– 1 cup caramel sauce
Instructions:
1. In a large mixing bowl, combine the chopped apples, evaporated milk, sugar, mini marshmallows, and chopped nuts.
2. Drizzle the caramel sauce over the mixture and stir gently until everything is well combined.
3. Cover the bowl and refrigerate for at least 1 hour to let the flavors meld together.
Serve chilled for a delightful dessert that everyone will rave about!
Tips:
– Choose tart apples for a balanced sweetness.
– Feel free to mix in other fruits like grapes or pears for added flavor.
Frequently Asked Questions:
– Can I prepare this ahead of time?
Yes! It tastes even better the next day as it chills.
– What other toppings can I add?
You can sprinkle some chocolate chips or coconut for extra flair!
This playful twist on a classic dessert will bring smiles to your table!
Taffy Apple Salad
Editor’s Choice

Ghirardelli Caramel Sauce Squeeze Bottle, 16 oz (Pack of 1)
Umite Chef Mixing Bowls with Airtight Lids Set, 8PCS Stainless Steel Kha…
23. S’mores Cheesecake

Imagine enjoying a slice of creamy s’mores cheesecake that captures the essence of a campfire treat. With its rich texture, thanks to evaporated milk, this dessert is sure to impress at any gathering. The graham cracker crust adds a delightful crunch, making it a perfect balance of flavors and textures. Whether you’re hosting a summer barbecue or a cozy indoor party, this cheesecake will bring smiles all around.
Overview:
Servings: 8 | Prep Time: 25 minutes | Total Time: 6 hours (includes chilling) | Calories: 400 per slice
This s’mores cheesecake is not just a dessert; it’s an experience. The combination of chocolate, marshmallows, and creamy filling will transport you right to the campfire. Plus, it’s easy to make ahead, so you can enjoy stress-free entertaining.
Ingredients:
– 1 ½ cups graham cracker crumbs
– ½ cup sugar
– ½ cup unsalted butter, melted
– 2 cups cream cheese, softened
– 1 cup evaporated milk
– 1 cup mini marshmallows
– 1 cup chocolate chips
Instructions:
1. Mix the graham cracker crumbs, sugar, and melted butter in a bowl until well combined. Press this mixture firmly into the bottom of a springform pan to form a crust.
2. In another bowl, beat the cream cheese, evaporated milk, and sugar until smooth and creamy.
3. Gently fold in mini marshmallows and chocolate chips, then pour this mixture over the prepared crust.
4. Refrigerate for at least 6 hours or overnight to set properly.
Serve chilled and consider toasting extra mini marshmallows on top with a kitchen torch for a fun campfire vibe! A drizzle of chocolate sauce can also add a sweet touch.
Tips:
– Prepare this cheesecake a day in advance for the best flavor.
– If you don’t have mini marshmallows, regular ones work too; just chop them up into smaller pieces.
This s’mores cheesecake is sure to be a hit, making your dessert table both inviting and delicious! Enjoy every bite!
S’mores Cheesecake
Editor’s Choice

TBTEEK Butane Torch, Kitchen Torch Cooking Torch with Safety Lock & Adju…

24. Caramel Flan

Indulge in the creamy delight of caramel flan, a dessert that never disappoints. With its silky texture and sweet caramel topping, it’s perfect for any occasion. Plus, using evaporated milk adds a rich creaminess that makes each bite melt in your mouth.
This dessert is not just delicious; it’s a true showstopper for your dinner parties. Your guests will be impressed, and you’ll love how simple it is to prepare.
Overview:
Servings: 8 | Prep Time: 15 minutes | Total Time: 3 hours (includes chilling) | Calories: 250 per serving
Ingredients:
– 1 cup sugar (for caramel)
– 1 can (12 oz) evaporated milk
– 1 can (14 oz) sweetened condensed milk
– 4 large eggs
– 1 teaspoon vanilla extract
Instructions:
1. Preheat your oven to 350°F (175°C).
2. In a medium saucepan, melt the sugar over medium heat. Stir gently until it turns a golden brown color. Quickly pour the caramel into a flan mold or a round baking dish, tilting it to coat the bottom evenly.
3. In a blender, mix the evaporated milk, sweetened condensed milk, eggs, and vanilla extract. Blend until smooth and creamy.
4. Carefully pour the milk mixture over the caramel in the mold.
5. Place the mold in a larger baking dish filled with hot water to create a water bath. Bake for about 1 hour or until set.
6. Let it cool for a while, then refrigerate for at least 2 hours before serving.
7. To serve, run a knife around the edges and invert the flan onto a plate.
Chill it well for the best texture and flavor!
Tips:
– Watch the sugar closely while caramelizing for the best flavor.
– This dessert is great to make ahead. It gets even better after a day in the fridge.
Frequently Asked Questions:
– How do I store leftovers? Keep it covered in the fridge for up to 4 days.
– Can I make this ahead? Absolutely! It’s a perfect make-ahead dessert.
With its elegant presentation and mouthwatering taste, this caramel flan will be a favorite in your dessert repertoire!
Caramel Flan
Editor’s Choice

IMUSA 1.5Qt Stainless Steel Flan Mold with Lid, Round Baking Pan for Fla…

BLACK+DECKER Countertop Blender with 6-Cup Glass Jar, 10-Speed Settings,…
25. Chocolate Covered Strawberries

Imagine biting into a ripe, juicy strawberry enveloped in rich chocolate. Each bite bursts with flavor and texture, making these strawberries a favorite for many. You can even personalize them with sprinkles or crushed nuts for extra flair.
Let’s get started! Here’s what you’ll need:
Ingredients:
– 1 pound fresh strawberries
– 12 oz semi-sweet chocolate chips
– ½ cup evaporated milk
Instructions:
1. First, wash the strawberries gently and pat them dry. Keep the stems on for easy dipping.
2. Next, melt the chocolate chips with the evaporated milk in a double boiler. Stir until it’s smooth and creamy.
3. Dip each strawberry into the melted chocolate, letting the excess chocolate drip off.
4. Finally, place the dipped strawberries on a parchment-lined baking sheet and put them in the fridge to set.
Tips: Add colorful sprinkles or chopped nuts on top before the chocolate hardens for a fun twist!
Frequently Asked Questions:
– How long do chocolate covered strawberries last?
They taste best fresh but will stay good in the fridge for up to 2 days.
– Can I use white chocolate instead of semi-sweet?
Absolutely! White chocolate offers a sweet variation that pairs wonderfully with strawberries.
Enjoy this simple yet indulgent treat that’s sure to impress everyone!
Chocolate Covered Strawberries
Editor’s Choice

Stainless Steel Double Boiler Pot for Melting Chocolate, Candy and Candl…

365 by Whole Foods Market, Semi-Sweet Chocolate Baking Chips, 12 Ounce

Amazon Basics Parchment Paper for Baking, Non-Stick, 90 Sq Ft Roll, 1 Pack
Conclusion

These 25 decadent dessert recipes using evaporated milk showcase just how versatile this ingredient can be in the world of sweets. From creamy cheesecakes to refreshing mousse, each recipe offers a delightful way to indulge your sweet tooth.
Try these recipes at home and experience the rich, creamy textures that evaporated milk brings to your desserts. Whether for a special occasion or just a treat for yourself, these desserts are sure to impress!
Note: We aim to provide accurate product links, but some may occasionally expire or become unavailable. If this happens, please search directly on Amazon for the product or a suitable alternative.
This post contains Amazon affiliate links, meaning I may earn a small commission if you purchase through my links, at no extra cost to you.
Frequently Asked Questions
What Are Some Easy Dessert Recipes Using Evaporated Milk?
If you’re looking for easy dessert recipes that use evaporated milk, you’re in luck! You can whip up delicious treats like no-bake cheesecake, creamy rice pudding, or a rich chocolate mousse in no time. These recipes provide that smooth, creamy texture you’re after without the need for extensive baking.
How Does Evaporated Milk Improve Dessert Texture?
Evaporated milk is a fantastic ingredient that enhances the creamy texture of desserts. It’s made by removing about 60% of the water from regular milk, which concentrates its flavor and richness. This means that when you use it in recipes, you can achieve a velvety consistency that elevates your evaporated milk desserts to a whole new level!
Can I Substitute Evaporated Milk in Baking Recipes?
Absolutely! You can substitute evaporated milk for regular milk or cream in many baking recipes. Just remember that it’s more concentrated, so you might want to dilute it with a little water (equal parts) if the recipe calls for liquid milk. This way, you can still enjoy those rich dessert ideas without compromising on flavor or texture.
What Are Some Creative Uses for Evaporated Milk in Desserts?
Evaporated milk can be a game-changer in the dessert world! Consider using it in creamy custards, luscious puddings, or even as a base for ice cream. You can also incorporate it into fudge or caramel sauces for an added depth of flavor. The possibilities are endless when it comes to creating decadent no-bake desserts!
Is Evaporated Milk the Same as Condensed Milk?
Great question! While both evaporated milk and condensed milk are made by removing water from milk, they are not the same. Evaporated milk is unsweetened and has a creamy texture, while condensed milk is sweetened, making it much thicker and sweeter. If your recipe specifically calls for evaporated milk, it’s best to stick to it for the intended flavor and texture.
Related Topics
evaporated milk desserts
creamy dessert recipes
no-bake desserts
rich dessert ideas
easy dessert recipes
dessert recipes using evaporated milk
quick desserts
decadent treats
simple dessert ideas
baking with evaporated milk
sweet indulgence
family-friendly desserts